
HUGE NEWS FLASH!!!
Click here HERE to see the HUGE NEWS FLASH!!!
 1st day of Spring today YAHOO! Lost is on tonight YIPPY! and More HUGE news But I’m gonna wait and see if you all know what it is ..Shhhhhhh ( I will be back today with the HUGE announcement ) and today a New Tutorial to make this card which I call my Secret panel card .. Not sure if thats what the original name of this card is But thats what I am calling it.. I actually have 2 tutorials today but for the sake of not uploading tons of photos I will point you to where the other tutorial is Okey dokey ? for my secret panel card I used pixie pink & apricot appeal along with whisper white . This was actually one of the card I had sent in for the display stamper for SU! convention ( which I was not picked for ) Today is to great to let that get me down !! also once you start viewing the photos you will notice a few numbers not appearing this is because I am trying to keep the amount of photos I have to upload on my blog down to a minimum But all steps are listed in written directions a couple without actual photo sorry But I do think you all can still understand the tutorial even if a few photos are not shown .. I believe in YOU!! and KNOW YOU CAN DO IT .. your gonna love it !! and so will the receive of this card you send it too ( wink wink )
Ok lets get started 1st you will need 2 pieces of cardstock ( coordinating colors ) cutter , scoring tool, scissors and of course your stamp set of choice I am using burst into bloom, all year cheer I ( its your Day ) and Be Happy set ( smile ) I will be showing you how to make this card and decorating it is up to you .. Okey dokey ?
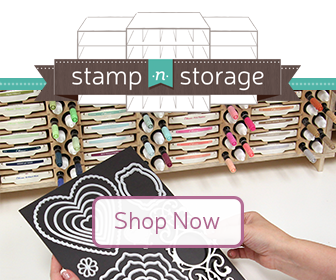
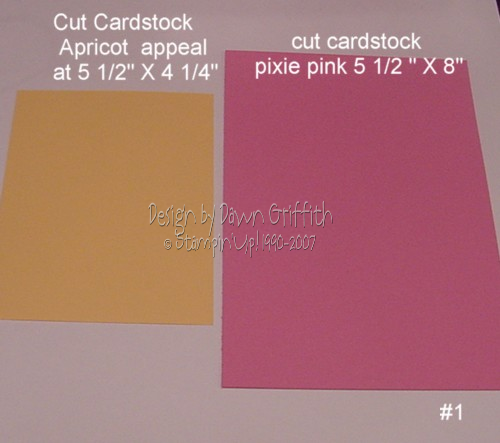
#1 Ok cut your 2 pieces of cardstock Your main card ( pixie Pink) will be cut at 5 1/2" X 8" and the 2 smaller pieces ( apricot Appeal ) will be cut at 5 1/2 X the notch right before 2" ( not sure what that measurement is right now ( Help Diane )  #2 score your main card ( Pixie pink ) at 2" 4" and 6"
 NEXT fold your main piece ( pixie pink so it resembles a W as shown in photo #5
 Next pinch the center point of your "W" this is where you will be using your scissors to make 2 slits try to keep your cuts in equal distance apart as shown in photo #6 cut your slits up to the score line
OK now open your card and lay flat this is what your card should look like now in photo #7

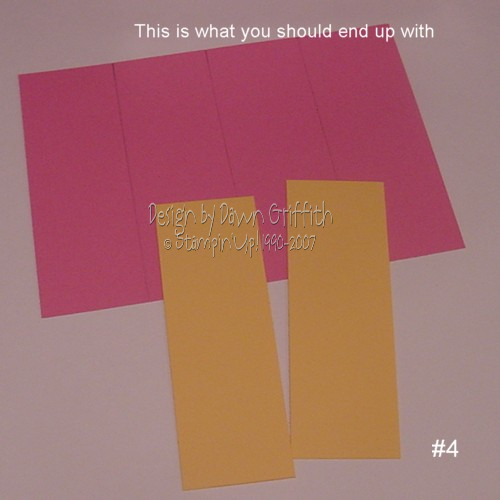
Ok Next take your small 2 pieces ( apricot appeal ) and weave them into your slit cuts as shown in photo #8 making sure to make them opposite each other .. weave one down and up and the other up and down as shown in photo #8 This is what you should end up with  in Photo #9
Ok next we need to activate your secret panel card to activate you will need to close your card as shown in photos # 10  once you close your card you will be looking very very closely to your center of the card where the weaves pieces are .. look for a Small slit running down the center It may not pop out at you But it is there.( I promise ) Once you find the slit pry them apart . Look at photo the next photo for a closer view on what to be looking for
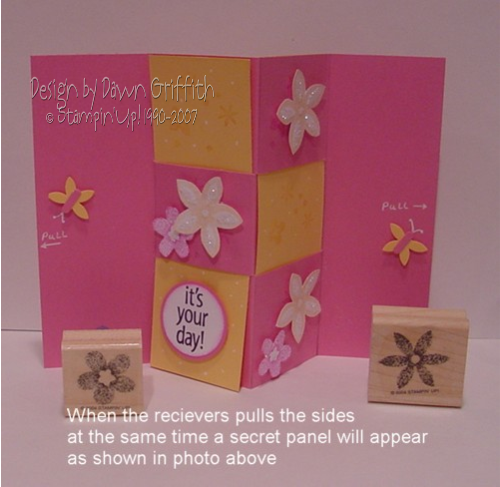
OK now your card is activated this is what it should look like .. and ready for you to send ..  Yes this is the way you will mail your card to its lucky receiver .
 Now you must add the word PULL on each of the sides so the receiver nows to actually pull the 2 sides to make your secret panel card work I have added butterflies to my pull words just for a special touch. ( keep reading down for my link to my tutorial on my butterflies )
Ok so thats it … Now decorate your secret panel card .  This is my finished card ready to be sent out
 If you need to view a larger photo just click on image to do so …
Now this is what happens when you pull the sides at the same time your secret panel will appear when pulled
My tutorial on how to make the butterflies is located HERE in my Web shots gallery sorry my photos of my butterfly tutorial are not very clear But I hope you will get the idea anyway .. these are very easy to make with just 2 punches. Please go view my link to learn how to make these adorable butterflies .. ( Thanks goes to Michelle Fisher for the butterfly inspiration ) . cant wait to hear how much you love this card .. and I am soo excited to share the HUGE news with you today BUT Imust wait alittle longer .. some of you may know before others BUT I will be back today with the HUGE announcement and all the details …
On to my other favorite subject MY HUBBY .. Hubby called last night and yes he got all 26 shots I had 12 of them listed But most I never even heard of .. But just a few are Yellow fever , TB, Hepatitis series, Malaria, rabies, etc… he got all shots mainly in his arm he said this morning he isn’t to bad in the sore department . today he gets the results of all that happened yesterday and more videos , classes and processing will be done also today .. Thank you for all your emails on your prayers and thoughts for us .. you will never know how much this helps me to know your all praying for us .. Thank you from the bottom of my heart ..
Hey don’t forget to watch LOST tonight .. YIPPY! so excited about that and Hubby will be calling again tonight even more excited about that .. wink wink
Please let me know if you have any questions or need help with my tutorial today .. looking forward to hearing what you all have to say about whatever is on your mind today . Have a Great day today I know you will cause it is the 1st day of SPRING !!
Until later … Happy Stampin!!


Dawn,
This is the coolest tutorial EVER. Thank you so much for sharing. Also sending out happy thoughts and prayers for your family as you take on this new adventure.
TFS
Dawn B.
Great card Dawn! I can’t wait to give this a try . . . so pretty!
Dawn,
Another award winner! A talent that is second to none. God’s protection to Rich. This can be a very trying time as my 21-year old nephew has been in Camp Liberty, Iraq since Sept 06. What’s nice is we can email each other. We don’t have to wait for snail mail we are only a click away. lol Susan R.
Awesome!! I”ll have to try this when I get over this icky cold. 🙁
Thanks for sharing the tutorial!
hello awsome tuttorail demonstrator dawn,i love your blog with the cool cards you make and receive.i have a quetion for you what is april’s speacal??? do you know yet from your stamping queen philly
I love this card, especially since I took the class and have made 2 of them since then 1 to give away (masculine) blue/brown cs and the other to keep as a male sample, KWIM?
Love,
Stampin Queen Gina
oxoxoxoxoxoxxoxoxo
hello, remember me. what i like about my demonstrator? she makes so many wonderful things, and someday, i would like to grow up to be just like dawn. the blog, what can i say. it’s the highlight of my day. THIS DOESN’T SOUND TOOO DEEP DOES IT??????
STAMPIN QUEEN RONNIE
CONGRATULATIONS Dawn on the SCS tutorial this week!!!
GREAT ONE!!!
Dawnie, WTG on that SCS tutorial! I love that crab. XOXO
Love the card – will have to give it a try – and so good to see your tutorial on SCS!
Great Job on making the SCS tutorial!! You are such a great inspiration! You make things look so easy!
Stampin Queen Jenny
I just stumbled across your blog and I love it! I’m a very new SU demonstrator, struggling to find my way – very inspiring for newbies like me! Thanks.
I had to come back to tell you that I made your card. It is so easy and awesome. I could not have done this without your tutorial. It is tricky. Great job Dawn.
Thanks,
Dawn B.
Dawn,
Congrats on the tutorial on SCS!!! I can’t wait to get my own crabby pants. Always love your designs.
Love, Stampin Queen Laura
Sorry Dawn, thanks for reminding me to sign off as Stampin Queen Susan. Again great tutorial. lol
When I checked my email, I opened my SCS Weekly Inklings and saw the tutorial. I immediately thought “This is something Dawn would do!” I knew without having to go to SCS that you were the author of the tutorial.
But I’m mad at you… All the cute cards you have made with the crab set makes me want it very badly. You are a very bad girl,making us all want what you have. Loved both tutorials. As always, keep up the great work!!!
Congrats on the tutorial… You GO GIRL! I also wanted to say thanks for the scissor charms. I absolutely LOVE them, sorry I didn’t get to email you sooner. They are FAB and I want to keep them all for myself vs. giving them as gifts hehehe.
hang in there!
bobbie
Wow…now that is a tricky card! Maybe I have to study it more.
Congrats on the OTHER big news flash!
Woohoo! Great tutorial, Dawn! (Both of them, actually. . .;-D)
This is a very cool tutorial! I just did the one you had posted at SCS. Great job, and thanks!!
Congratulations on the Splitcoast tutorial, I love your work so it’s no surprise!
Love this card too!
Hey, Congrats on the tutortial. I have not tried a shadow box, yet but I swear I am going too.