
 Hi girls .. Here is the Star tutorial I really hope this makes sense to you .. 1st of all you will need a 6×6 piece of Designer paper , Bone folder, Cutter ( for scoring) Scissors and a long body stapler and some type of cord or ribbon Thats it … Ok are you ready to begin ? Remember you can click photo to enlarge .

Score your 6×6 piece of Designer paper at 1,2,3,4,& 5

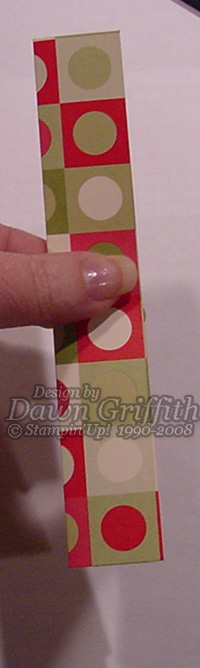
what ever side you want your star design to be you will lay your 6×6 piece of DS paper face down ( shown in photo )

Start by folding your DS paper accordian style as shown in photo.  Continue folding by flipping and folding until you reached the end
 This will be what the TOP of your star accordian fold will look like REMEMBER this is the TOP with the 3 mountain tops and YOU will be cutting the other side " Bottom " ( This is VERY important girls )
 Next you will Then insert your accordian folded strip into your cutter and score a light mark at 3" this will be the center of your strip ( This mark only severs as a reminder for the next step .. If you can eye ball the center then skip this step Hee! Hee!
 Ok Now using the long body stapler you will staple in the center ( as shown in this photo ) over top of the light score line you made in previous step

Ok now we are ready for cutting .. REMEMBER you will always be cutting on the BOTTOM side ( Refer back to step 5) ok place your thumb over the center staple and this will serve as your guide where to cut I am right handed so my cuts and the bottom of the strip is facing right ( Very important girls )

Ok now start cutting at an angle to the top left side .. start cutting just below your thumb ( as shown in photo ) If you need to cut more you can always cut more off later But you can never put it back on so until you make your 1st one it is always better to cut less than to MUCH KWIM? wink wink !

Next Flip your strip upward and cut the next side the same way as shown in photo . Using your thumb as your guide again
 Ok once your done cutting your angles this is what the BOTTOM of your star will look like
Ok now comes the folding .. Remember once you get the folding part down you will just play around with your finished star making adjustments to postion your star YOU will not need any adhesive
 Ok next fold one panel at a time upward making a crease to have it stand up shown in the photo . You may want to fold the accordian strip in half to make this part easier just to get the center creased so each panel will stand upward
 OK here comes the trick girls I really think the photo explains this best since I find it hard to put into words .. Ok I will try . once you have your panel standing upward take your panel and lay it down to your table making sure to make the triangle Point in the center .. You see the star forming now dont you ??

Continue doing this to all the panels as shown in previous step .
 Once you have done all your panels now comes the playing … just postion your star panels by adjusting them and pushing the centers out or in whatever you want your finished Star to look like. Final step is punch a tiny hole in the top of one panel and add your cording .. TA DA you made your Star for decorating your Home , tree and or gifts . Dont you just love it ??
 Dawns EXTRA Bonus TIP: Now you can make even smaller stars using these directions BUT to make a smaller star cut your piece of DS paper at 3×3 and score at 1/2" , 1", 1 1/2", 2" & 2 1/2" and follow the steps above this makes such a cute tiny tiny star. I hope you had fun making your stars girls have a fabulous day and thanks for peeking in today ..
Until tomorrow … Happy Stampin!!


Thanks Dawn. You rock!
YAH!!!! Thanks for this really easy to follow tutorial!! These little ones would be perfect hanging from a gift bag with one of those handmade bows too! You rock girl!
You did it!!! Awesome tutorial girlfriend!! Have a good day…xoxo Angie
Well Dawn, you under estimate yourself because you tutuorial was very well illustrated and very understandable. You are so great! I love this star I am going to try and make one of these today along with all the other gazillion things I have to do.
Thanks so much! I’m definately going to try this :).
Thank you so much for sharing an awesome tutorial for us. These are great to make to add as a present topper. You Rock!!!!! Have a blessed day!
Thanks so much! Can’t wait to try this out at home tonight….Just tested it on a piece of scrap paper at work…can’t wait to see what fun stars I can come-up with tonight! YOU ROCK!
~ Kathy C. (Hillsboro, OR)
Amazing, absolutely!
I read your blog every day. i realized i have never said thank you for all the instructions, all the eye candy and all the wonderful conversation you provide me with before work. i appreciate all the tutorials(i am a visual person or forget about it!), and i really enjoy all that you fill your blog with. God Bless you and your wonderful family and the happiest, holiest of holidays to you all. thanks!
janice
Wow Dawn! Thanks so much for these super easy directons!!!!! I think I will make these to put on each of the baked goods baskets I will be making this year. Can’t wait to try!
This is a wonderful tutorial. Thank you so much for posting it!
awesome, gf!!! thanks for sharing sweets! you r the bestest!!!
luv ya,
Jen
What a fabulous idea. !!! Thanks for posting the how-tos.
Wow…thanks for another awesome tute, Dawn!! Your star is sooo pretty!! You ROCK!!
Great tutorial, thanks for sharing this pretty star!
this is sooooo cool! i’m excited to try this one, TFS!
Oh Dawn this is just gorgeous! Thank you for showing us how to make these beautiful stars – I love them! I just made my first one right now! Your instructions are very easy to understand! I am going to make some gold stars for my Christmas tree!
Bless you, you are an angel!
Hugs from Sunshine!!
xo
Tankyou for posting it!
It’s easy and don’t need a pattern, fantastic!
I really like it.
Have a nice day 😀
Take breaks throughout the day. It will help clear your mind and relieve pressure. Something as simple as going to the water cooler for a drink may do the trick.To help your workday go smoothly, try pacing your activities.