
I have had quite a few of my blogger girls want the directions for this pop up so I thought Why not do a tutorial for you all on it .. ok you will need your cutter , bone folder , sticky strip and of course card stock and a stamp set to decorate . and I used white gg ribbon with mine today so if you may want that also :-). Remember you can click on any photo and view larger . Also I have added the quick link to this turorial under Dawns Turorials on the left hand side for future use .
 ok you will cut your base card for your pop up at 4 1/4 X 11" you will score at one end as shown in photo at 1", 2 3/4 " 3 3/4" and then at 5 1/2"
 Then flip to score the other end the same way as shown in photo #2
 Next you will cut your pop up slit on the 5 1/2 score line .. I cut mine at 3 1/4 " doesnt really matter how big or small you cut this, Its totally up to you . Just DON’T cut all the way across
 Now you will fold all your score lines & also add your sticky strip to both ends where the 1" score line is as shown in photo.
 This is also the time to will stamp the base of your card . I am using the new holiday mini set Seaon of Joy
Ok now measure your cut line and this will be your main size so your pop up can slide through . Make sure to cut smaller then the slit so it slides smoothly ( Dawns Side note for my whisper white pop up piece it measures 2 3/4 X 5 1/4 the purely pomagrante piece to layer my whisper white onto measures 3" x 5 1/2 ) Stamp your pop up piece before you insert or go to next step .
 Ok now that you have your pop up piece cut and stamped you will slide this piece from the back side of your base card through the cut slit center as shown in photo … Make sure your stamped images are all on the same side
 Here is a view of what it looks like from the back side adhere the center pop up piece to one of the sides with sticky strip ( Place the pop up piece right to the edge of the 1′ score line. Click to enlarge photo ) it will look like the photo of the back side .
 Ok now line up both ends that has sticky strip and adhere together..( as shown in photo ) This will secure the pop up and will make it work when you open and closed your pop up .
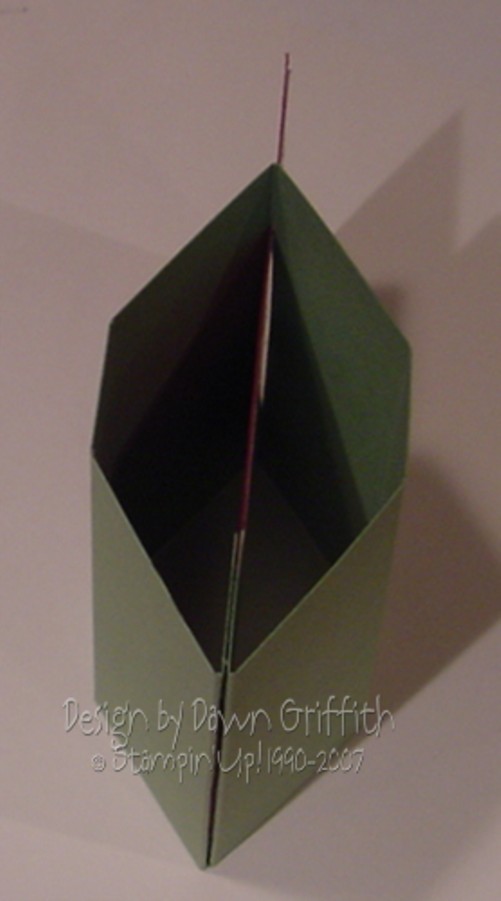
 You did it ! Yahoo!! Here this is what your card will look like opened up and sitting upright . To add ribbon just feed underneath and wrap around to front and tie easy peasy Right ?
  Here is a photo of the side view.
  This card will fold down flat and will fit in your standard size envelope( as shown in photo) .
Thanks girls Have a Fabulous weekend and let me see yours when you make one & post to your blog 🙂 Have FUN!
until later .. Happy Stampin!


wwwhhhooo!! too cool Dawn!! This looks great. Can’t wait to give it a go soon!
Hope you have a FANTASTIC weekend! I notice you can do the countdown on ONE hand now…that’s when Chloe always gets excited even more!
Hi Dawn, Thanks sooooo much for this tutorial. I got one at convention and now I’m glad I don’t have to figure the directions. It’s tooo cute! Thanks, Kim
What a beautiful project (love the colors and stamp set you used). Thanks for the tutorial… now If I can just do it! Maybe Angie will help 🙂
Love it Dawn – thanks so much for the tutorial, I will now have to try one of my own! I do so much better with visual so I appreciate the directions! *STAMPIN HUGS* Alex
I haven’t tried one of these yet…and I definitely need to now!! Super cute, and thanks so much for another rockin’ tutorial!!!
Way to go girlfriend, an oldie, but a goodie! I remember it was at your mother’s house that you taught this to us. So great to make in person with you to help us get thru it, kwim? Tell Judy I said that I miss her too!
hey girl, oh my gosh, that is sooooo awesome…thanks so much for the instructions and I’m ordering that set right now…I need a pick me up!!! Sorry I’m so late checking in today..it’s been one of those days!! love ya!
thanks babe – I will have to try this… way cool!!!
4 more days – Yipee-ay-yay!!!
hugs,
Jen
Love it, great with the new set — I just LOVE those die cut stamps, too!
Pat
http://www.patstamps.blogspot.com
Wow! This Pop up card is awesome. I have never seen one like this before. Thank you soooooo much for making the tutorial Dawn. I will be coming back when I have time to make one.:)
Mary
Super Tutorial !!! I haven’t done this kind of card in a long time and need to do one again…I’ll be using your tutorial because I had completely forgotten how to do it.
Holy Canoli Batman….3 MORE DAYS !!!!!! I’m crawling out of my skin with excitement for you !!!
Love ya tons…
Wow, that is so cool. Thanks for the tutorial. I will have to try this.
Thanks for the tutorial. I haven’t made one of these yet so will have to give it a try.
I’m linking your blog from mine. Check out my blog and return the link if you like what you see.
Jane
I have been looking for a template for this card style for awhile. Sure appreciate your instructions, Thanks so very much. Hugs n’ Stuff, Lynne
Saw the video…watched it once, started the video again, had to stop in the middle of it & go create one. Love it! I will be posting it on my blog tonight! Thanks! You’re great!
This is a clever idea. Thank you very much for the instruccions.
Dawn this is awsome. I am in the proscess of making one. Im waiting for a marker to come. I stamped with the snow flakes and am using the shepard boy. Thanks for all your tips